Want to know where you stand compared to other compliance leaders? Then take our Digital Audit and Inspection Management Readiness Quiz.
Summary: An inspection checklist in Excel gives teams a practical way to structure audits, assign responses, and keep basic records in one spreadsheet. It works well for simple programs, but growing compliance needs often require stronger workflow, reporting, and traceability tools.
An inspection checklist in Excel can help teams organize audit questions, standardize reviews, and track completion in a familiar format. This guide walks through the setup process and shows where Excel works well, along with the limits teams should plan for as programs grow.
You can use a checklist in Excel in many ways, such as:
- Facility Safety Inspections
- Quality Control Audits
- Supplier Self Assessments
- ESG Assessments
- and much more.
This step-by-step guide will help you create audit checklists in Excel from scratch. You can also use a checklist template that is already available in Microsoft Word or Excel. You can find a variety of checklist templates for different purposes and industries on the Microsoft Office website.
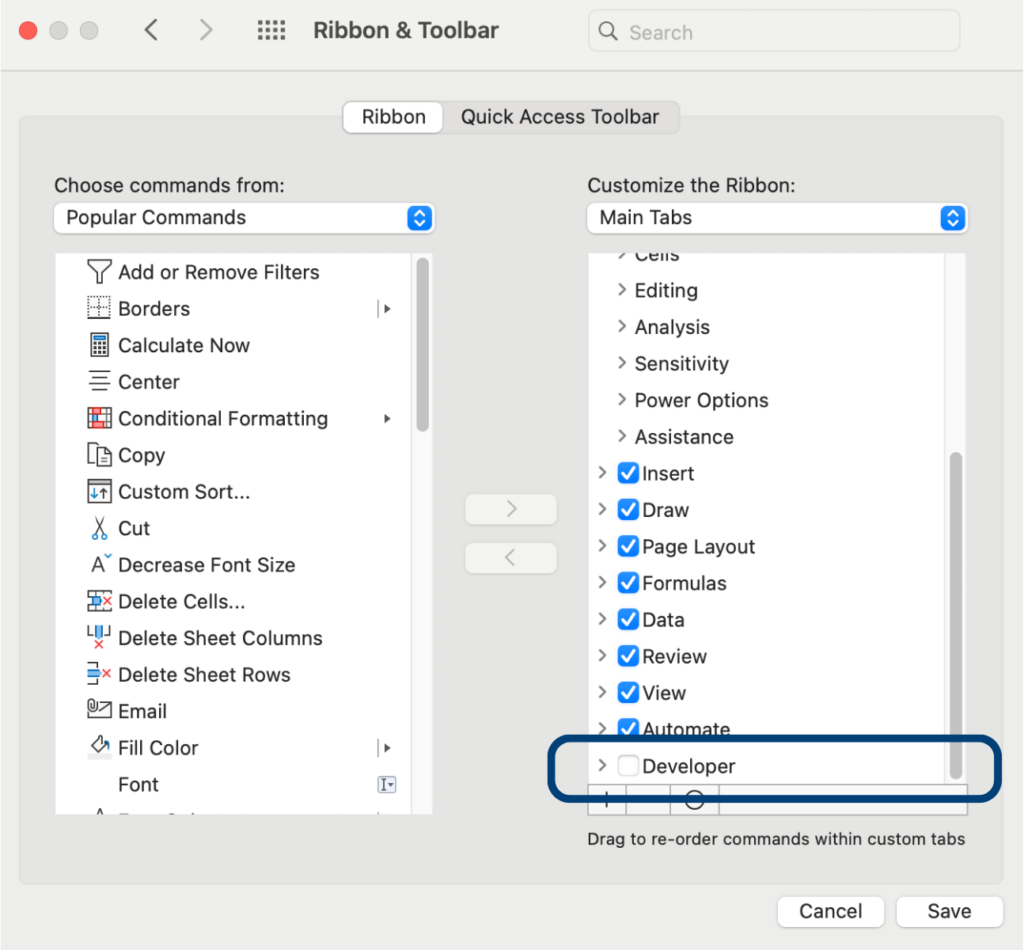
Step 1: Enable the Developer Tab for an Inspection Checklist in Excel
The first step to creating an inspection/audit checklist in Excel is to enable the Developer tab. The Developer tab is where you can find the checkbox form control, which is the main feature of a checklist in Excel.
To enable the Developer tab with the Windows version of Excel, you can
- right-click on the ribbon and select Customize the Ribbon
- or go to File > Options > Customize the Ribbon.
- In the Customize the Ribbon window, check the box next to Developer in the list of main tabs
- click OK.
Note: for Mac users, the Developer tab can be found by heading to the app Preferences and choosing ‘Ribbon & Toolbar’.
Step 2: Enter Your Audit or Inspection Items
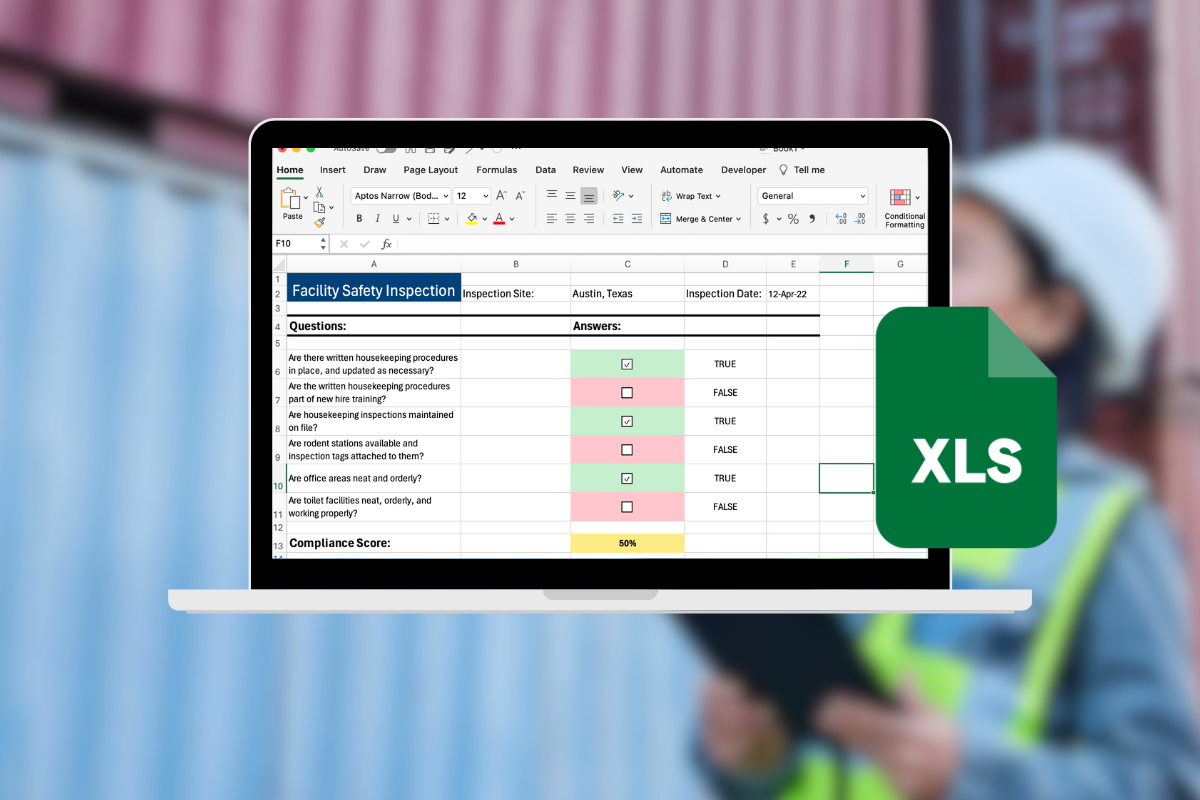
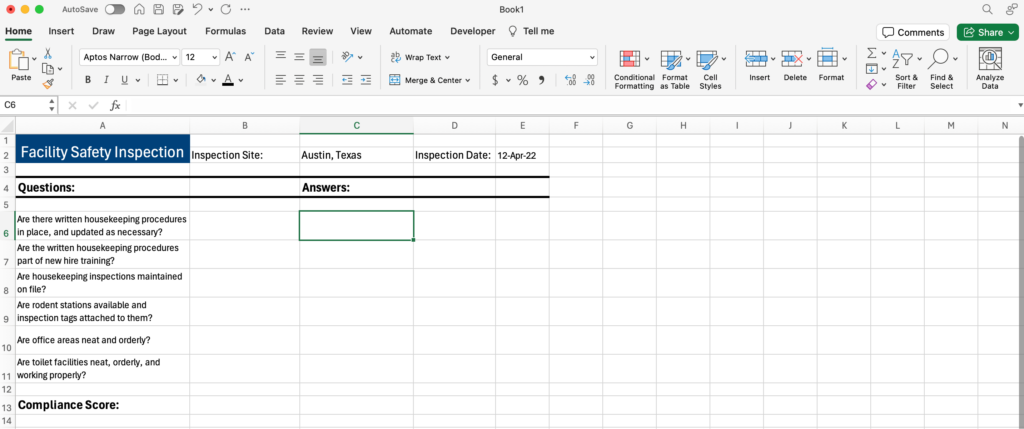
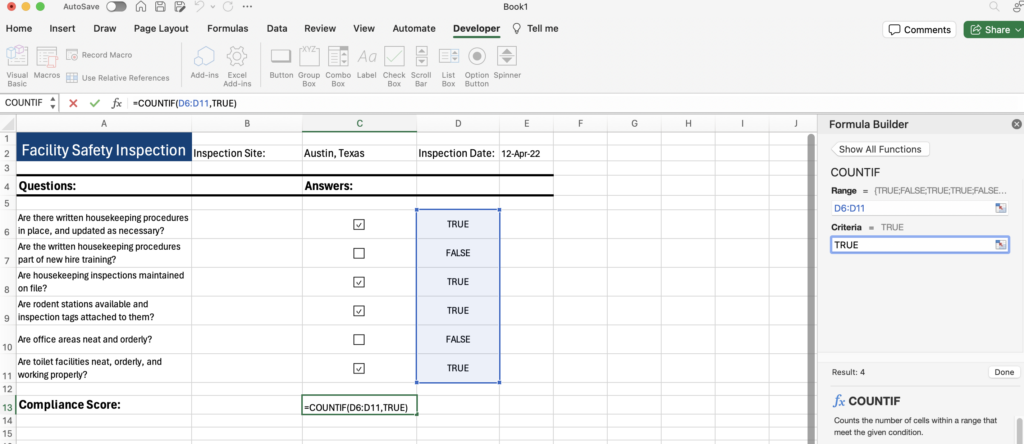
The next step is to create a list of items that you want to include in your checklist. You can enter tasks or checklist questions, one per cell, in a column or a row. For example, if you want to create a checklist for a Facility Safety Inspection, you’ll be better off entering your inspection questions into a single column rather than a row.
Be sure to add headings, such as site name, date of inspection, and a name field for the inspector in one of the top rows of your checklist to help better organize your checklist. Also, include at the bottom of your checklist a compliance scoring row.
Here is an example of a checklist being built for a Facility Safety Inspection:
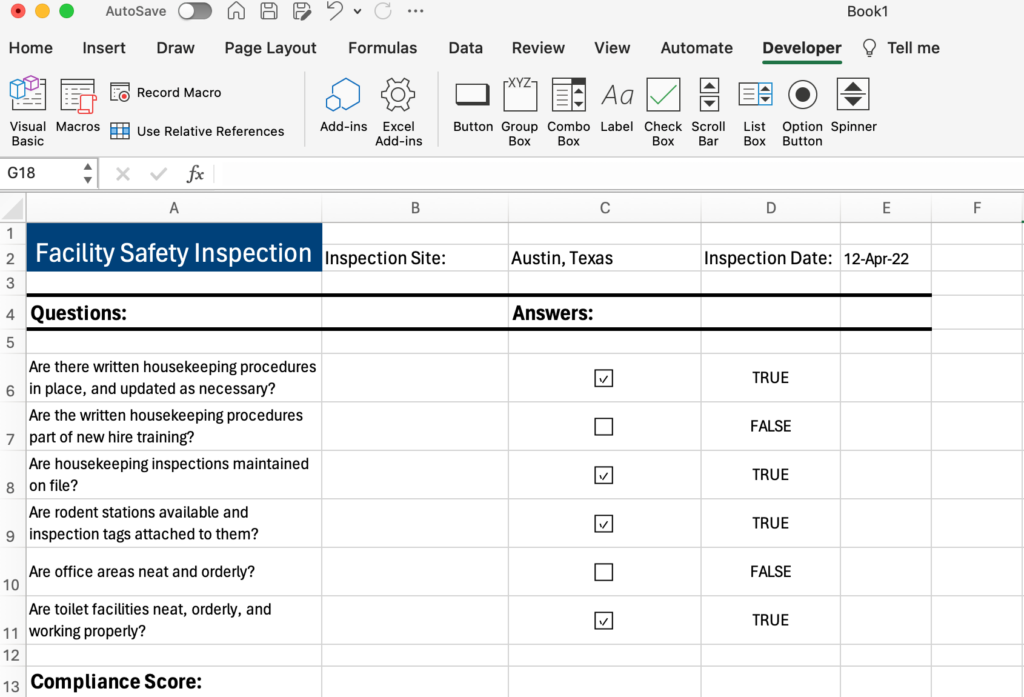
Step 3: Add Interactive Checkboxes to Your List
With your checklist design built, the third step is to add the interactive checkboxes to your list. This way you can mark your questions as met or not met, safe or a risk, compliant or not compliant, etc. A checkbox is a form control that allows you to select or deselect an item by clicking on it.
Aside from checkboxes, you have other input options available within Excel. For instance, you can add radio buttons or dropdown answer options to your checklist.
To insert a checkbox into Excel, follow these steps:
- Click on the cell where you want to insert the checkbox
- Go to the Developer tab and click Checkbox
- Click on the cell where you want to place the checkbox
- Delete the default text next to the checkbox by pressing the Delete key
- Position the checkbox by right-clicking on the checkbox and dragging it

Alternatively, you can use the fill handle to copy and paste the checkbox. The fill handle is the small square at the bottom right corner of the selected cell. To use the fill handle:
- Select the cell with the checkbox
- Hover the mouse cursor over the fill handle at the bottom right corner of the cell until it turns into a black cross
- Drag the fill handle down to the last cell where you want to paste the checkbox
- Release the mouse button
Amego Inc.
Before using Certainty, QA auditors at Amego Inc. were burdened by a laborious audit procedure that involved completing paper-based checklists on-site and manually typing the results into an Excel template once they returned to the office.
With Certainty, Amego Inc.’s Quality Assurance team has shortened their site reviews by 8 hours per review as well as reduced their audit cycle down to just 6 months.

Reduce Risk, Ensure
Compliance, and Improve
Performance
Step 4: Setting Up Your Checkboxes
For internal audits and inspections, you’ll want to know how your operations perform based on compliance regulations. That means you’ll need to implement scoring into your checklist.
To do this, first, you’ll need to link each checkbox. What we are doing here is linking the state of the checkbox to a cell. We essentially are setting up our checklist to recognize whether a checkbox is checked or unchecked – thus allowing you to compile your inspection data results.
To link your checkbox to a cell, follow these steps:
- Press and hold the Control button and click on the top checkbox
- Select ‘Format Control’
- Under the Control tab, click the Cell Link text box and click the cell to the right of the checkbox you have selected
- Click ‘OK’
- Repeat this step for each checkbox
An additional way you can do this is to hold Control and click on the checkbox, then in the formula bar type ‘=’ followed by clicking the cell link location.
Now, while it may appear visually that nothing has happened, if you click on your checkboxes you’ll see a ‘TRUE’ appear when the box is checked, and a ‘FALSE’ when you uncheck a checked box.
Step 5: Format Your Checklist Scoring
In this step, you will add a function that will tally how many checkboxes are checked, thus giving you an audit score that can help you determine whether corrective actions need to be made.
In our example, we’re going to put our total score in cell C13 in line with our Compliance Score block.
Here are the steps to add scoring:
- Click on the cell you wish to place your score
- Click the ‘Fx’ button on your formula bar
- Search for ‘COUNTIF’ and insert the function
- Your range is the cells that are linked and display either TRUE or FALSE
- Your criteria is ‘true’
How to Turn Your Total Score into a Percentage
Having a total score is great, but for large audits, you’ll want to know your percentage of checked boxes. To do this we’ll need to build off of the COUNTIF function we just made.
After clicking on the cell with your checklist’s total score, return to the formula bar and add ‘/COUNTA’. For the COUNTA function, your range will be the cells containing the questions.

You’ll see that your compliance score is now a decimal. To change that to represent a percentage, click the ‘%’ symbol under the Home tab.
Step 6: Add Conditional Formatting
Conditional formatting is not mandatory but is a nice feature to better visualize your audit and inspection checklist performance. Let’s explore a few ideas that you can implement.
Format compliance score
- Click on the cell where your overall compliance score is displayed.
- Under the Home tab select Conditional Formatting and opt to create a New Rule
- Choose the style of the 3-Color Scale
- Make your type a Number
- For Minimum enter 0
- For Midpoint enter 0.5
- For Maximum enter 1

Now your compliance score has not only a percentage value but also a color representation.

Format Checkboxes
Let’s say you want to see which checkboxes are left unchecked and may need further attention for corrective actions. We can use conditional formatting to help make visualization easier.
- Select the first cell with a checkbox (not the checkbox itself)
- Under the Home tab click New Rule under the Conditional Formatting dropdown
- Under the Classic styling select “Use a formula to determine which cells to format”
- Enter = [the cell adjacent with your selected cell in Step 1]=TRUE
- Example: =D6=TRUE
- Select the green fill with dark green text
- Click OK
- Repeat these steps within the same cell but instead of entering TRUE in the formula you’ll enter FALSE and pick the light red fill with dark red text

Important: Once you’ve done these steps in the first cell do not drag and copy the formatting to your other checkboxes as it will corrupt the linkages you made with each checkbox. Instead, follow these steps:
- Click on your now formatted cell
- Under the Home Tab select Copy Formatting which is the paintbrush icon
- Click and drag the formatting tool to the rest of your checkbox cells

Why Choose Certainty Software for Checklist Building?
If you are still using Excel to create and manage your checklists, you are missing out on the benefits of using a dedicated audit and inspection management software like Certainty Software. Excel is a powerful and versatile tool, but it is not designed for checklist building. It has several limitations and drawbacks, such as:
Excel’s Limitations: Despite its widespread use, Excel falls short in the realm of checklist management, especially for enterprises.
Static and Passive: Excel checklists lack the interactivity needed for efficient management. Without features like comment integration or task triggers, it’s like navigating a maze blindfolded.
Prone to Errors: The risks associated with Excel are significant. Data corruption, loss, and lack of version control can disrupt operations and compromise accuracy.
Time-Consuming: Crafting and updating Excel checklists demands substantial manual effort. From formatting to data entry, valuable time is spent on mundane tasks instead of strategic initiatives.
Disconnected: Excel’s standalone nature inhibits seamless collaboration and integration across departments. In today’s interconnected business landscape, siloed data is a roadblock to efficiency.
The Certainty Software Advantage
Enter Certainty Software – the solution tailored for enterprise checklist management. Here’s why Certainty stands out:
Interactivity: Experience the power of dynamic checklists. With Certainty Software, you can effortlessly mark items as complete, add detailed comments, and trigger automated actions based on outcomes.
Safe and Reliable: Trust is paramount in enterprise operations. Certainty Software offers robust security measures, granular access controls, and comprehensive audit trails to safeguard your checklist data.
Effortless Creation: Say goodbye to manual drudgery. Choose from our extensive template library or customize your checklists with ease. Streamline processes and drive productivity without sacrificing quality.
Connected and Integrated: Break down departmental barriers with seamless collaboration. Certainty Software facilitates real-time sharing, integration with existing systems, and smooth data exchange, empowering your enterprise to operate as a cohesive unit.
Ready to make your audit and inspections easier to make and manage? Book a call with our team today to learn how Certainty can help.
After the examples of use cases, add: 'An inspection checklist in Excel is useful for simple internal reviews when teams need a low-cost way to standardize questions and responses.'
In the setup instructions, add: 'To make an inspection checklist in Excel easier to complete, use clear labels, consistent scoring, and space for comments or evidence.'
Near the end, add: 'As requirements become more complex, an inspection checklist in Excel may need to be replaced with dedicated audit software for better control and reporting.'
Frequently Asked Questions (FAQs)
How do you create an inspection checklist in Excel?
Start by enabling the Developer tab, setting up checklist columns, and inserting checkbox controls if needed. Then add clear questions, response options, and space for notes or corrective actions.
Is Excel good for audit checklists?
Excel can work for smaller teams or simple inspections because it is familiar and flexible. However, it becomes harder to manage when you need approvals, mobile access, evidence capture, or consolidated reporting across sites.
What should be included in an inspection checklist in Excel?
Include inspection questions, response fields, scoring or pass-fail options, comments, ownership, and due dates for actions. If relevant, add sections for evidence and sign-off.
When should a team move beyond Excel checklists?
Teams should consider dedicated software when spreadsheets create version-control issues, delayed reporting, or manual follow-up work. A digital system is especially helpful when inspections happen across multiple sites or on mobile devices.